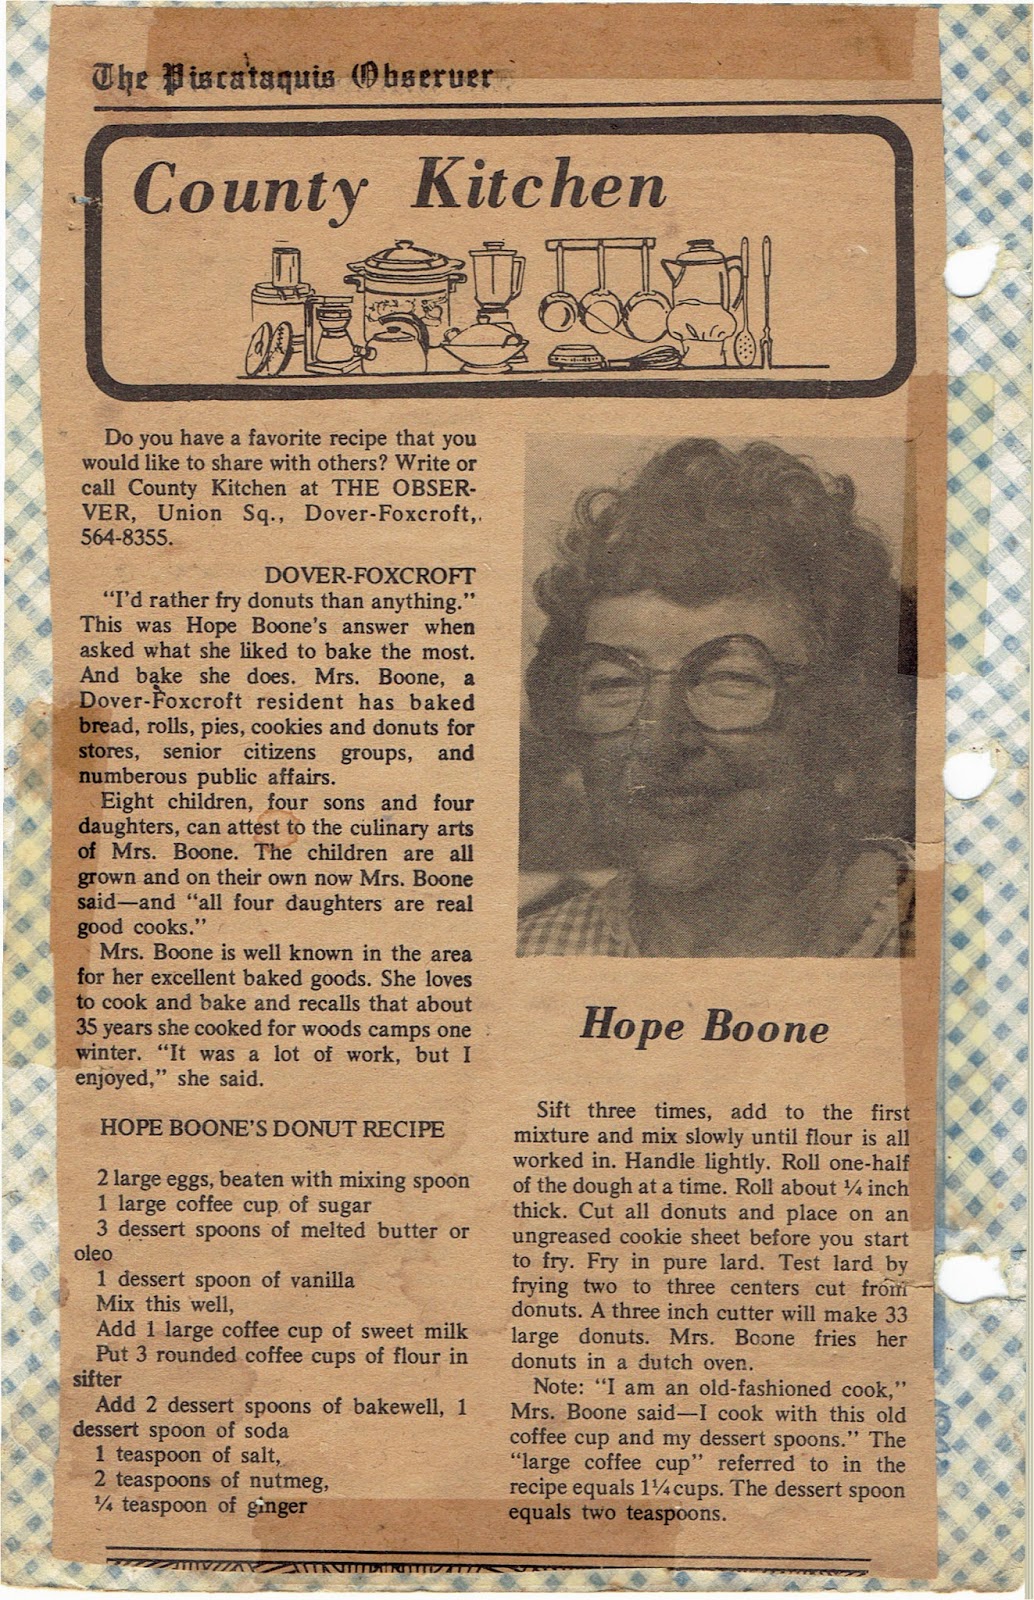
Friday, January 29, 2010

Gnocchi (n-yo-ki)

Oh, the most beautiful of pastas! And I really mean that. Ya know, I am not really a homemade pasta kind of woman. I've never made it, but it just looks like a whole lot more work than I'm willing to do, at least at this point in my life. We'll see what happens when I actually have some counter space!

Gnocchi though--oh, gnocchi! It is SOOOOO worth the effort. (Of course, it also helps that Mike's the one who makes it.) Mike has made it a few times, and here is what he says:

Potatoes: some people will say you need to use a certain kind of potato. Truth be told, he's used reds, golds, and russets. It doesn't matter, as long as it equals about one large russet potato.

1. Boil in enough water to just cover the potato. (You may need to add more as it evaporates.) NOTE: Don't put the potato into the water after it's boiling. They should heat up together. This prevents the skin from loosening and floating around in the water.

2. The potato is done when it's soft enough to poke a fork into but doesn't break apart. At this point, take it out and with a hand mixer or a potato masher, break the potato up. It should
come out grainy more than whipped. (You can peel it if you want to, but he never does.)

3. Add a beaten egg to the potato and mix it in. Add salt and pepper, and even garlic if you like.

4. Add flour by the handful to the potato until it forms a dough that is soft but not sticky. It takes about two of Mike's handfuls, but just add it and mix until it feels right.

5. Break off a chunk of the dough and put on a lightly floured surface. Roll the dough into a snake about a half-inch thick. With a sharp knife,
cut the snake into pieces about an inch wide. You'll need plenty of counter space so the cut gnocchi don't touch each other. Repeat with the rest of the dough until it's all done.

6. In a pot of boiling water, maintained at medium-high, drop the gnocchi in one at a time, not by handfuls. They still can't touch! Pay attention because the gnocchi will cook quickly--between 30 and 60 seconds. As soon as they rise to the surface, spoon them out into a dish. Repeat until they're all finished.

7. We used pesto for our sauce, Classico was really good, and topped it with freshly grated Parmesan. We sauteed mushrooms, bell pepper, tomatoes, olives, and onion and mixed those in with the finished gnocchi and served it with seasoned chicken, a salad, and bread sticks.


Altogether, there was enough food to easily feed us and our three guests. Without the breadsticks and chicken, it might have been more a three-person meal. You can adjust it as necessary.

Sunday, November 22, 2009

Mincemeat Pie

This is Nana Conner's mincemeat pie recipe, and it is dang good. For those of you who aren't familiar with mincemeat, I will warn you it is an intense flavor, and as for making it, it takes quite a bit of chopping. If you have a blender though, you can do it without a grinder, which is what I did.

This is cut WAY down--enough to make one pie. It also makes it kind of hard to give exact amounts on some things, but here are approximations (without a grinder):

1 c. cooked beef (NOT ground beef; I used some steak cuts)
2 c. apples (about two good-sized braeburns)
1/3 c. suet (just ask for it at the butcher's), cut into slices and blended fine in blender
about 1/2 lb. raisins, blended in a blender (they don't need to be as fine as the meat)

Cut the beef into small strips and shred in a blender. Dice the apples fine. (These two steps take the longest, but after that it's pretty easy.) Mix together in a large mixing bowl with the suet and raisins.

Mix with:
about 1/3 c. vinegar
1 T. molasses

Sprinkle in:
cloves
nutmeg
allspice
ginger
cinnamon
1 c. sugar
salt

I just sprinkled and stirred, sprinkled and stirred until it smelled like mincemeat.

Cook all together in large, deep skillet until apples are tender but not mushy.

You can can it for months I guess, but since I just made enough for one pie, I put it into jars and let it sit in the fridge for about a week like Aunt Rinda said to. It came out great!

Corn Bread-Oyster Stuffing

I've used this recipe for quite a few years now and we love it!

1-1/2 cups butter
2 pkg (8 oz. size) corn bread stuffing mix
3 cans (7 oz. size) oysters
1/2 cup each chopped onion, green pepper, and celery
1 tsp. salt
1/2 tsp. dried rosemary
1/4 tsp. pepper
  1. In 6-qt pot, heat 1 cup water and 1 cup butter, to melt butter. Remove from heat, toss with stuffing mix.
  2. Drain oysters; cut in half. In 1/2 cup butter in medium pan, saute oysters, onion, green pepper, and celery, 5 minutes. Add salt, rosemary, pepper. Add to stuffing; toss lightly to mix well.

Makes enough for a large (20-25 lb.) turkey.

Pumpkin Whoopie Pies

We love whoopie pies--who doesn't? Ever since Mal had a pumpkin whoopie pie when she worked in Bar Harbor, I've searched for a good recipe, but never found one until this. It's wonderful! This recipe is taken from http://www.familyfun.com/.

PUMPKIN COOKIES:
2 eggs
2 cups light brown sugar
1 cup vegetable oil
1 teaspoon vanilla extract
1 (15-ounce) can pumpkin
3 cups flour
1 tablespoon pumpkin pie spice
1 teaspoon baking powder
1 teaspoon baking soda
1 teaspoon salt

FILLING/CREAM CHEESE FROSTING:
4 ounces cream cheese, softened
1/2 cup butter, softened
2 teaspoons vanilla extract
4 to 5 cups confectioners' sugar

Instructions:
Heat the oven to 350 degrees. Beat the eggs, brown sugar, oil, and vanilla extract in a mixing bowl until smooth. Stir in the pumpkin. In a separate bowl, combine the flour, pumpkin spice, baking powder, baking soda, and salt. Add the dry ingredients to the egg mixture a half cup at a time, blending each time until smooth.
Drop a heaping tablespoon of batter onto an ungreased cookie sheet, using a moist finger or the back of a spoon to slightly flatten each mound. Bake the cookies for 12 minutes, then transfer them to a wire rack to cool completely.
Meanwhile, make the frosting. Beat together the cream cheese, butter, and vanilla extract in a bowl until light and fluffy. Mix in the confectioners' sugar a half cup at a time, until the frosting is spreadable.
To assemble the pies, turn half of the cookies bottom side up and spread a generous amount of cream cheese frosting on each one. Top them with the remaining cookies (turned right side up). Makes 2 dozen whoopie pies.

Sunday, October 25, 2009

Pistachio Pudding Cake

This is the cake Mike asked for every year before he met me and decided to switch to cheese cake. He was craving it enough the past few weeks to finally call his mother and get the ingredients. (I had to call and get the recipe from his sister, since he didn't do it when he had his mom on the phone.) Anyway, here it is!

Cake:
1 yellow cake mix
3 eggs
1 small package instant pistachio pudding mix
1 c. club soda
1/4 c. oil
1/2 c. nuts, chopped (I used walnuts)

Beat all ingredients well for two minutes. Bake at 350 for 45-50 minutes.

Icing:
1 package Dream Whip (or any whipped topping mix)
1 small package instant pistachio pudding mix
1 1/2 c. milk

Mix until thickened. Sprinkle with more chopped nuts if desired.

The cake can be served hot, but it's a lot better served chilled. The colder the better!

Wednesday, July 1, 2009

Medovyi pirog - Russian Honey Cake

For my Russian culture class, we had FOOD DAY today! (I have been looking forward to this day for months!) We were instructed to bring in anything we liked as long as it was actually Russian. I made медовый пирог (pronounced medovyi pirog... kind of) or, honey cake. It takes a while just because the process requires some cooling periods, etc, but it's really not that hard. I tried to include pictures all the way through because there are times when you wont think it looks like there's any force on this planet that could make it look the way it should in the end, but it will.

Ingredients:
Cake -
2 eggs
3/4 c. sugar
1 t. baking soda
1 T. honey (warm)
7 T. butter
2 c. flour

Filling and Icing -
3 1/4 c. sour cream (about 720 g)
1/2 c. sugar (it's to taste, but it comes out to about 1/2 c. Too much and it loses it's tanginess)
1 T. honey
ground/finely chopped walnuts
crushed plain sweet biscuit crumbs*

1. Beat eggs and sugar together well. Add soda and honey.
2. Melt butter in a medium saucepan. Add the eggs/sugar mixture. (Don't let butter burn.)
3. Turn the saucepan to low, add the flour while mixing. Mix until smooth. (It will be very thick and hard to stir.) Remove from heat and allow to cool. It will look like there's no way on earth you will be able to "dip" the dough in anything, but it's actually much more
formed than it looks.

4. Preheat oven to 355 F.
5. Dip the dough in flour, divide, roll each layer
very thin (conversions from metric say .02-.04 of an inch). see picture at left


6. Cut circles as round as possible, about 7 inches in diameter. (I used my 6-inch spring-form pan frame to do this.) Bake on parchment or wax paper-covered cookie sheets for 2-4 minutes. (Watch the first couple carefully to see how your oven does it.) see picture at left
7. Cool completely before assembling.


8. Beat sour cream, sugar, and honey until the sugar dissolves. The mixture will be fairly liquid.
9. Coat each layer with a generous layer of cream. Assemble the cake, coat the finished assembly with cream and sprinkle top and sides with crumbs and walnuts. Allow to set at least 6 hours before eating.


Ta-da! It looks extremely Russian on my blue-and-white plates too! (And you all thought that was strictly a Dutch thing.) Everyone loved it! It has a great balance between tangy and sweet. The Russians love sour cream, and this cake is a testimony to how talented they are with it.

*About the crumbs, I am fairly certain that
whoever translated this either was British or learned British English as opposed to American, which means I wasn't entirely sure what they meant by "sweet biscuit crumbs." I thought they might mean cookies, like Nilla waffers, which would probably work, but frankly, I was too cheap to buy Nilla waffers for the sake of a cake that I knew would taste excellent with just a TON of nuts on top, and it was already too hot in my house to bother baking "sweet biscuits." So I scrapped it.

Monday, April 27, 2009

Chilean Pevre

This makes A TON! My mum, who still has five kids at home, cuts it in half when she makes it for our family, so you can adjust it accordingly. This is really a party-sized amount, but it's the recipe Vero gave us.

NOTE: Pevre is kind of like a salsa, which means you can chop the ingredients as big or as small as you want. Vero keeps them fairly small, but they're still definitely chunks.

2 white onions, chopped
10 tomatoes, peeled and chopped (again, adjust according to your family)
fresh cilantro - rinse in cold water; twist off stems; twist to tear in half; chop
2 lemons, juiced
1/4 c. olive oil
1/2 c. salt - I know it's a lot. You'll really use it to taste
Mexican style tomato sauce, to taste (typically between 1/4 and 1/2 cup

1. Combine onions with salt (to taste). Mix and let set for 10 minutes.
2. Peel tomatoes, chop cilantro, mix together.
3. Squeeze out excess moisture in onions. Mix with tomatoes and cilantro.
4. Add rest of ingredients and mix together.

It's really good on chips, french bread, or you could even toast the bread a little to make a sort of bruschetta. Tasty!